Linchakin

Showing posts with label Food Network. Show all posts

...Pumpkin Cheesecake

 October 28, 2015     dessert, Fall, Food Network, holiday     No comments   

Although Canadian Thanksgiving has passed, with Halloween around the corner, I thought this pumpkin cheesecake might still be relevant to some of you looking for a pumpkin related dessert.  This recipe was taken from Nigella Lawson's "Feast" and it was very simple to follow and turned out great.  I didn't bother to dress it up or worry too much about the crack down the centre after it baked- sometimes all that matters is how it tastes!  This version, Nigella claims to be "fluffier and subtler" than a regular cheesecake and I would have to agree.  Nice one, Nigella!

As you may know, UK recipes use mass rather than volume so if you have a digital scale this will be a piece of cake (haha), if not, just look up the conversions.  Also, just as a warning, this recipe recommends cooling the cake in the fridge overnight before consuming so plan ahead.

Ingredients: (Serves 8-12)
For the base:
-250 g digestive biscuits
-1/4 teaspoon ground cinnamon
-125 g soft butter

For the filling:
-1 x 425g can pumpkin puree (or process your own)
-750g cream cheese
-200g sugar (I used 180 g since I like it less sweet but it's your call)
-6 eggs
-Juice of 1/2 lemon

Method:

1. In a processor, blend the biscuits and cinnamon until you have a fine crumble.  Then add the butter a bit at a time and blend until the mixture clumps together.

2.  Press the mixture evenly into a round 23cm springform pan to form the base.  Put this into the fridge whilst making the filling.  Preheat the oven to 170 C (which is 340 F).

3.  Blend the pumpkin puree and cream cheese until thoroughly combined.  Then add the sugar.  Then add one egg at a time.  Be sure to scrape the sides of the mixing bowl to get everything mixed in.  Add the lemon juice and blend for a further 10 seconds.

4.  Wrap the outside of the springform pan with a double/triple layer of plastic wrap to ensure it is waterproof.  Then wrap it again with a large piece of tinfoil so that the foil is up around the edges of the pan.  Sit this foil covered pan in a roasting pan.

5.  Put the cheesecake filling into the springform pan and pour hot water into the roasting pan so that the water level is halfway up the cake pan.

6.  Bake for about 1.75 hours or until the filling has set (Nigella says "only a small amount of wobble left at it's centre" ?!?!?).  Cool and then put into the fridge overnight before removing from the springform to slice and eat.


Enjoy!
Read More
  • Share This:  
  •  Facebook
  •  Twitter
  •  Google+
  •  Stumble
  •  Digg

...Minute Rice with Chef John Higgins (GIVEAWAY CONTEST!)

 May 04, 2015     Food Network, Giveaway, Minute Rice     No comments   

We're excited to hold a giveaway contest sponsored by Minute Rice.  Read to the end of this post to find out how you can enter to win!
Photo courtesy of ctvnews.ca


What can I say about rice?  Eat it, all day, everyday.  At least that was the case growing up in a Chinese family.  A proper Chinese meal is not complete with rice, as I'm sure is the case with many other Asian cuisines.  These days we don't necessarily have rice everyday but it is an ingredient that is so versatile and easy to incorporate into any kind of meal, that we always have a large bin of it on hand.


Last week we were invited to watch Chef John Higgins (Director of George Brown Chef School, a judge on the Food Network’s Chopped Canada and former personal chef for the Queen Mother) cook up some Minute Rice.  As someone who eats rice frequently, sometimes you can get in a recipe rut so Chef Higgins' message of experimenting with seasonings and flavour was inspiring.  We typically use water to cook our rice so we're excited to use stock, spices and herbs to spice things up (pun intended).  I particularly liked the idea of roasting nuts to bring out the oils and use them to cook with rice for a nutty flavour.  

So what is the deal with Minute Rice? Instead of waiting 15 minutes or more for your rice to cook, Minute Rice is done in 5-10 minutes (white/brown rice dependent).  Minute Rice is simply pre-cooked 100% natural, non-GMO verified rice that's dried so the cooking time is cut down by more than half.  If you're a risotto lover, Chef Higgins suggests Minute Rice may be your solution to slaving over the stove for an hour waiting for the rice to cook.

Here is the display worthy Veggie Rice Lasagna Loaf Chef Higgins demonstrated for us:
Veggie Rice Lasagna
Prep Time: 10 min
Cook Time: 20 min
Servings: 6

Ingredients:
-2 cups (500 ml)  Minute Rice® Instant Premium Long Grain White Rice
-1/4 cup (60 ml)              grated Parmesan cheese, good quality, if possible
-2 tbsp (30 ml)                olive oil
-2 bunches                     green onions, chopped
-1 pkg (10 oz/300 g)        frozen chopped spinach, thawed and squeezed well to remove liquid
-2 cloves (5 g)                 garlic, minced
-1 1/2 cups (375 ml)        light ricotta or cottage cheese
-1 cup (200 g)                 zucchini, sliced
-1 jar (24 oz/700 ml)        prepared marinara or home-made pasta sauce
-2 cups (500 ml)             shredded low fat Mozzarella cheese
-2 (145g)                        tomatoes, sliced

Method:

1.  Preheat oven to 350°F (180°C).  Prepare rice according to package directions.  Stir in the parmesan cheese and reserve.  

2.  Place 15 ml of the olive oil in a warm pan, then add the chopped green onions, followed by the spinach, and season with garlic.  Cook for one minute.  Add salt and pepper, then allow to cool.  Mix with ricotta cheese until combined.

3.  Place the rest of the olive oil in a non-stick pan.  Add the sliced zucchini.  Cook for 10 seconds on each side.  Season to taste.  Remove from the pan and place on a paper towel to absorb the oil and allow to cool.

4.  Spoon ¼ cup (60 ml) of the marinara sauce into a greased 8-inch (2L) square baking dish.  Gently press half of the rice into the baking dish in an even layer; sprinkle with ½ cup (125 ml) mozzarella cheese.  Spread half of the spinach mixture over the cheese.  

5.  Top with half of the tomato and zucchini slices, overlapping as needed.  Spoon half of the remaining marinara sauce over the slices.  Repeat the layers, ending with the sauce.

6.  Sprinkle evenly with the remaining cheese and bake for 20 minutes or until bubbly and golden on top.  Let stand for 5 minutes before slicing.

ENTER TO WIN!
To enter to win a case of Minute Rice (12 boxes, $60 value), you must be a Canadian resident and all you have to do is:

-Enter your email address (below via Rafflecopter)

-Double your chances of winning by following us on Twitter @dcfortheloveof and tweeting: 
"I followed and entered @dcfortheloveof giveaway for Minute Rice!"


a Rafflecopter giveaway
Just a reminder, to qualify you must follow us on Twitter!
A random winner will be selected from all the entries.  The contest closes on May 15, 2015.  In the meantime, if you want to pick up a box of Minute Rice, check out this $1 off coupon!

Photos courtesy of Gail Bergman PR
Read More
  • Share This:  
  •  Facebook
  •  Twitter
  •  Google+
  •  Stumble
  •  Digg

...Catelli's Healthy Harvest Ancient Grains with Chef Lynn Crawford (GIVEAWAY CONTEST!)

 March 19, 2015     Catelli, events, Food Network, Giveaway, Italian, Pasta     No comments   

We're excited to hold a giveaway contest for a year's supply of Catelli's Healthy Harvest Ancient Grains pasta ($200 value).  Read to the end of this post to find out how you can enter to win!

One of my favourite foods to eat growing up was my mother's spaghetti and meat sauce.  Growing up in a family where the cuisine was typically Chinese food, spaghetti and meat sauce was a change of pace.  Of course, my mother found a way to cook spaghetti Chinese style using the ingredients and flavours she knows best, by stir frying vegetables and meat with a soy and oyster based sauce.  Since then I've come to realize that pasta is a fantastic base for whatever flavours and ingredients you want to add.

Last week we were invited to the launch event of Catelli's Healthy Harvest Ancient Grains pasta with celebrity Chef Lynn Crawford.  We jumped at the opportunity and in the end had a great time tasting and cooking with Chef Lynn, who is as animated, humorous and genuine as she is on TV.  One of my favourite Chef Lynn quotes, "Did you just call me babe?" (Restaurant Makeover), is now replaced with her comment "I like vegetarians...that eat bacon, sometimes".  When asked which Calgary restaurant is her favourite, she gave a shoutout to her fellow chef friends at Charcut and Rouge.
Catelli's Healthy Harvest Ancient Grains pasta will be first launched in Western Canada only.  It comes in three pasta cuts: spaghetti, spaghettini and rotini.  The pasta is made from a blend of quinoa, amaranth, teff, sorghum, millet and GMO-free whole wheat.  Most of us know the health benefits of whole grains and ancient grains but the real question is how does it taste?  There is a slight nutty flavour and firmer texture to the pasta that we really enjoyed.  Here are three tips we found helpful that Chef Lynn shared with us to make the most of whole grain pasta:

-Delicate pasta shapes go well with delicate sauces and heartier, ridged shapes pair well with richer sauces and ragus.

-Whole grain pasta has the perfect texture for cold or chilled recipes and marinates well in tangy dressings.  The firmness of the noodles also provides a good base for both crunchy and juicy fresh vegetables

-Whole grain pasta can take on strong and complex flavours.   Ingredients that pair well include garlic, chilli, anchovies, rich pesto sauces and bitter or dark leafy greens such as kale, Swiss chard and radicchio.


We had the chance to make one of Chef Lynn's recipes- Chilled Noodle Salad with Ginger Wasabi Dressing.  This tasty recipe is perfect for the upcoming warmer months and is super quick to prepare.  In the time it took for us to boil the pasta we were done prepping the vegetables and ready to plate.  Stay tuned for the recipe.
Group shot!
ENTER TO WIN!
To enter to win a year's supply (60 boxes, valued at $200) of Catelli's Healthy Harvest Ancient Grains pasta, you must be a Canadian resident and all you have to do is:

-Comment below with your favourite pasta dish. (Use your first name to enter, it will have to match your email sender info.  Comments will be moderated.)

-Double your chances of winning by following us on Twitter @dcfortheloveof and tweeting (optional): 
"I entered @dcfortheloveof giveaway for a year supply of Catelli Healthy Harvest Ancient Grains pasta! http://bit.ly/1DDlwAy"

A random winner will be selected from all the entries.  The contest closes on April 1, 2015.  In the meantime, if you want to pick up a box of Catelli's Healthy Harvest Ancient Grains pasta, check out this $1 off coupon!

**CONTEST CLOSED- The winner is Lisa B. from Ottawa!  Congratulations!

Photos courtesy of Gail Bergman PR

Read More
  • Share This:  
  •  Facebook
  •  Twitter
  •  Google+
  •  Stumble
  •  Digg

...Sticky Toffee Pudding

 November 20, 2014     dessert, Food Network, holiday     No comments   

Sticky toffee pudding is my all-time favourite dessert.  We've had our fair share of sticky toffee puddings over the years and I was thrilled to find a recipe for it in Jamie Oliver's latest cookbook, Jamie Oliver's Comfort Food.  I decided to give it a try and see how it would turn out and was impressed with the results.  The soft cake once drizzled with the decadent toffee sauce, gives it the perfect pudding texture.  This recipe is definitely for a special occasion or the holiday season as it doesn't skimp on the ingredients that make it so delicious.
(Recipe adapted from Jamie Oliver's Comfort Food)

Ingredients:

Cake:
-4 Earl Grey tea bags
-1 lb fresh Medjool dates
-1 tsp cinnamon
-1 tsp nutmeg
-3/4 cup unsalted butter
-2 1/2 cups flour
-3 tsp baking powder
-1 tsp salt
-3/4 sugar
-1 cup dark brown sugar (I used regular brown sugar which turned out just fine)
-4 large eggs
-Sea salt
Toffee/Caramel Sauce:
-1 cup butter
-2/3 cup dark brown sugar (I used regular here too)
-1/2 cup sugar (Jamie calls for 3/4 cup; add more if you like it sweeter)
-3 tbsp dark rum
-1 1/4 cup heavy cream

Method:

1. Preheat oven to 350 F.  Steep tea bags for 3.5 minutes in 1 1/4 boiling water.

2.  Pit the dates and put in a food processor with cinnamon, nutmeg and steeped tea.  Push the dates to submerge them in the tea and leave them to soak for at least 10 minutes.
3.  While you are waiting for the dates to soften, butter and flour a bundt pan.  In a large bowl, cream the butter, sugar and brown sugar together using a wooden spoon.  My method is to use a downward chopping motion until the butter is incorporated.  Puree the dates.
Creamed butter and sugar
Pureed dates
4.  Beat in the eggs one by one and stir in the flour, baking powder and salt. Then fold in the pureed dates until the batter is smooth.
5.  Pour the batter into the bundt pan.  Bake for 45-50 minutes or until a skewer comes out clean.

6.  While you are waiting, start making the toffee.  Melt the butter, dark brown sugar and regular sugar on low heat in a small saucepan.  Once the butter is melted, add the rum and heavy cream.  Turn up the heat and bring the mixture to a boil.  Then let it simmer for 5 minutes until the toffee is a golden colour.

7.  Flip out the cake when it is ready and brush over or drizzle a third of the toffee while it is still hot. This creates a nice crisp surface when the pudding cools.  Sprinkle over a bit of sea salt.

8.  Serve each slice with a bit more of warm toffee.  If you like, ice cream also goes well on the side.
Enjoy!

Read More
  • Share This:  
  •  Facebook
  •  Twitter
  •  Google+
  •  Stumble
  •  Digg

...Nutmeg Butter Biscuits

 January 21, 2013     Breakfast, dessert, Food Network     No comments   

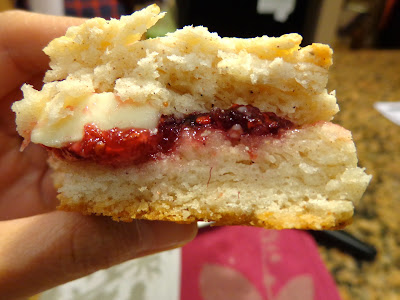
I saw this recipe recently on Chef Michael's Kitchen, where he made "Winterberry Shortcake" and had to try it.  To save on time, I decided to forgo the berry topping and whip cream.  Instead, I made the biscuits and stored them in a container over the week.  Whenever I wanted a biscuit, I would microwave it for 15 seconds, cut it in half and spread strawberry jam and a little pat of butter for extra buttery goodness.  The biscuits are so delicious and easy to make, especially with Michael Smith's tip of grating the frozen butter into the batter.


Recipe adapted from Chef Michael's Kitchen


Ingredients (Yields 8-12 biscuits)
-4 cups flour
-1/2 cup sugar
-2 tbsp baking powder
-1 tsp salt
-1 tbsp nutmeg
-1 cup frozen butter
-1 whisked egg
-1 1/4 cups milk
-1 tsp vanilla
-1 whisked egg for wash
-1/2 cup coarse or regular sugar for dusting

Method

1. Preheat oven to 400 F.

2. Mix together flour, sugar, baking powder, salt and nutmeg until evenly combined.  

3.  Grate frozen butter and mix into the flour mixture by gently tossing with your fingers.


4. Whisk together the egg, milk and vanilla.  Pour this into the flour solution and stir with a wooden spoon until a ball forms.


5.  Knead dough a few times until everything comes together; do not over work the dough.  The less you work the dough, the fluffier they will turn out.

6. On a floured surface, make an inch thick by rolling out or patting the dough (I did the latter).  Cut out  large circles and place onto the baking sheet.  (We used a clean tin can that happened to be handy)


7.  Brush each biscuit with the egg wash and give each a generous sprinkling of sugar.  


8.  Bake for 15 - 20 minutes, until golden.  


Enjoy!


Read More
  • Share This:  
  •  Facebook
  •  Twitter
  •  Google+
  •  Stumble
  •  Digg
Home

Copyright © Linchakin | Powered by Blogger
Design by Hardeep Asrani | Blogger Theme by NewBloggerThemes.com | Distributed By Gooyaabi Templates